Implementation Guide
Everything your IT team needs to install and validate the VectorCare SMART on FHIR app in your environment. It enables healthcare providers to coordinate patient care with their trusted network of service providers directly from their EHR. For background on the SMART on FHIR standard, see What is SMART on FHIR?.
App specifications
This section covers configuring the FHIR server URL in VectorCare, network requirements, OAuth2 client registration, scopes, and launch configuration for both non-production and production environments.
Configuring your FHIR server URL in VectorCare
VectorCare administrators configure their organization's FHIR server URL directly in the VectorCare app:
- Sign in to VectorCare as a user with administrator permissions.
- Navigate to Settings > Integrations > SMART on FHIR.
- Enter your FHIR server URL (e.g.,
https://example.vectorcare.com/api/FHIR/R4) into the FHIR URL field. - Click Save.
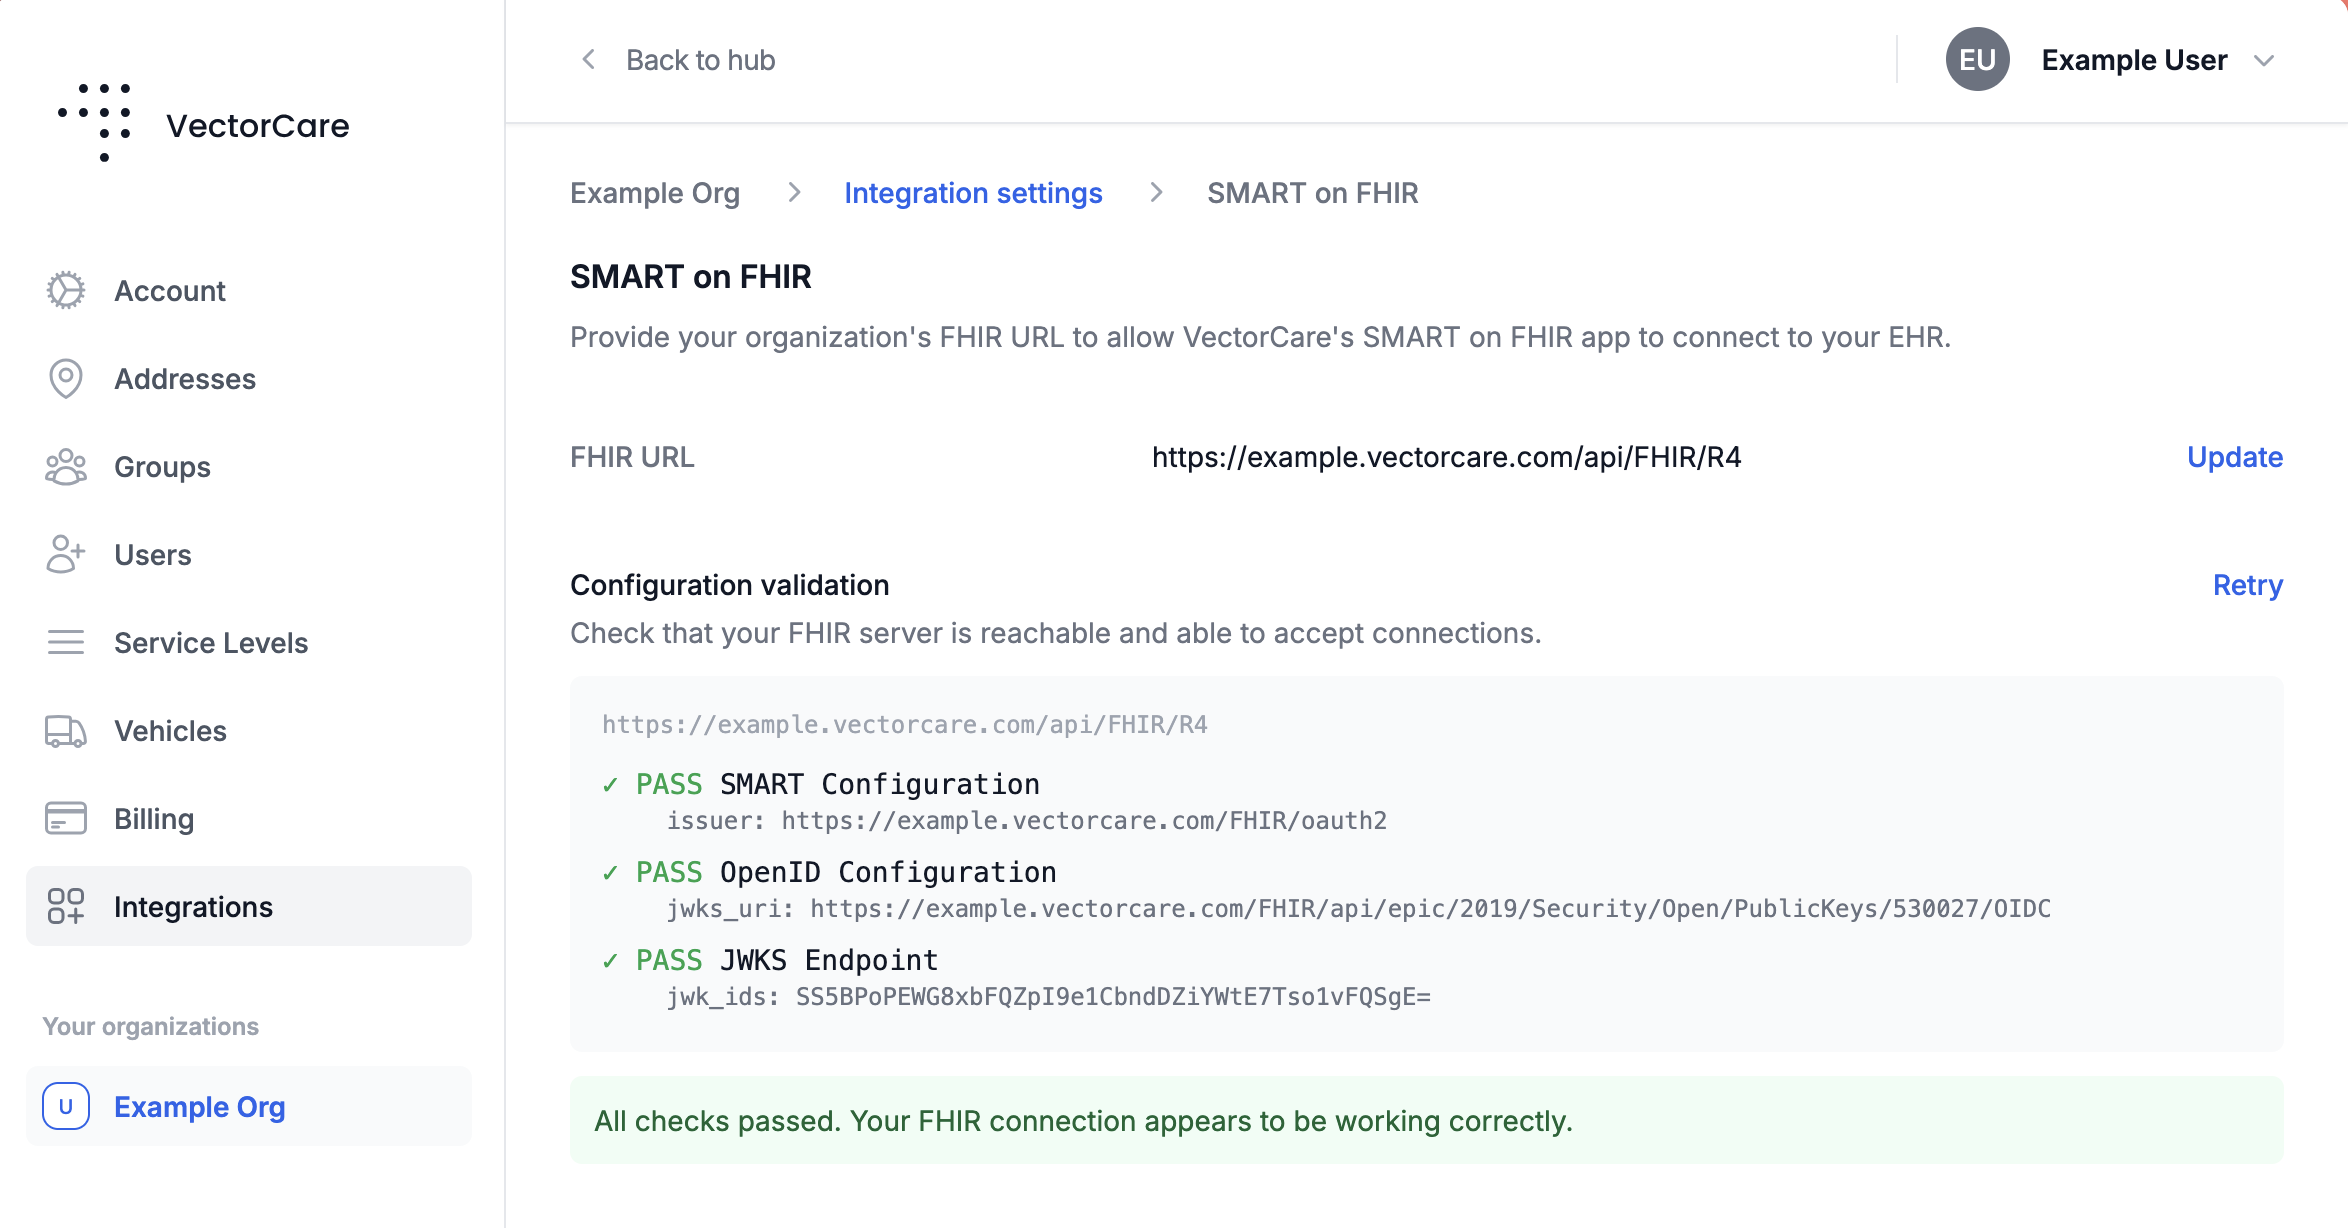
On save, VectorCare runs the following automatic discovery checks from its infrastructure:
- The SMART configuration endpoint (
/.well-known/smart-configuration) is reachable. - The
issuerextracted from the SMART configuration resolves a valid OpenID Connect document at/.well-known/openid-configuration. - The
jwks_uriextracted from the OIDC configuration is resolvable.
If everything resolves as expected, VectorCare displays an All checks passed notice and uses the discovered authorization server and OIDC issuer for subsequent OAuth2 flows. Run this verification in each environment (non-production and production) using the FHIR server URL for that environment.
Network requirements
All traffic is HTTPS (TLS 1.2+) on port 443. If your enterprise has firewall or web traffic restrictions, you may need to allow the following domains and IP addresses.
Outbound (from your infrastructure):
| Domain | Environment | Purpose | Required From |
|---|---|---|---|
fhir-uat.vectorcare.com | Non-prod | App and JWKS endpoint | EHR authorization server, end-user workstations |
fhir.vectorcare.com | Production | App and JWKS endpoint | EHR authorization server, end-user workstations |
*.apple-mapkit.com | Both | Map rendering | End-user workstations |
fonts.gstatic.com | Both | Web fonts | End-user workstations |
Inbound (from VectorCare to your infrastructure):
VectorCare's servers make FHIR API and OAuth2 calls to your EHR endpoints from the following IP addresses:
13.56.93.191
13.56.34.202
44.235.183.156
44.237.187.110
44.238.226.200
3.137.97.122
52.14.5.45
3.143.153.56
Allowlist these IPs for inbound HTTPS (port 443) access to your FHIR R4 and OAuth2 endpoints.
TIP
If your organization uses a web proxy or SSL inspection, ensure VectorCare domains are allowlisted or exempted from certificate re-signing, as certificate pinning may cause failures.
OAuth2 client registration
Register the VectorCare SMART on FHIR app in your EHR environment. Your VectorCare representative will provide the Client IDs and Org IDs for non-production and production.
| Field | Non-production | Production |
|---|---|---|
| Application Name | VectorCare SMART on FHIR | VectorCare SMART on FHIR |
| Client ID | Provided by VectorCare | Provided by VectorCare |
| Client Type | Confidential | Confidential |
| FHIR Version | R4 | R4 |
| Launch URL | https://fhir-uat.vectorcare.com/smart/launch?orgId=YOUR_ORG_ID | https://fhir.vectorcare.com/smart/launch?orgId=YOUR_ORG_ID |
| Redirect URI | https://fhir-uat.vectorcare.com/smart/callback | https://fhir.vectorcare.com/smart/callback |
| JWKS URI | https://fhir-uat.vectorcare.com/.well-known/jwks.json | https://fhir.vectorcare.com/.well-known/jwks.json |
| Client Authentication Method | private_key_jwt | private_key_jwt |
| Grant Types | Authorization Code, Refresh Token | Authorization Code, Refresh Token |
Replace YOUR_ORG_ID in the Launch URL with the Org ID provided by VectorCare for that environment.
At the token endpoint, the app presents a signed JWT as its client_assertion instead of a client secret. Your EHR's authorization server retrieves the matching public key from the JWKS URI and verifies the signature. No shared secret is transmitted.
Scopes
Your EHR environment must authorize the app to request the following scopes. These are the same for both non-production and production.
Launch and identity scopes (all required):
| Scope | Purpose |
|---|---|
launch | Receives the EHR launch context |
launch/patient | Requests patient context during launch |
launch/encounter | Requests encounter context during launch (optional — only if your workflows use encounter-based launches) |
openid | Enables OpenID Connect identity token |
profile | Includes user profile claims in the identity token |
fhirUser | Includes a FHIR Practitioner resource URL for the logged-in user in the ID token |
online_access | Requests a refresh token that remains valid as long as the end-user is online |
FHIR resource scope:
| Scope | Purpose |
|---|---|
patient/*.read | Read access to all patient-scoped FHIR resources (demographics, encounters, vitals, conditions, allergies, coverage, etc.) |
The app requests patient/*.read (wildcard) rather than individual resource scopes. This simplifies configuration and avoids the need to update scopes as new resources are supported.
Full scope string (copy-paste ready):
launch/patient launch/encounter patient/*.read openid fhirUser launch profile online_access
Launching from your EHR
Make the app launchable from within your EHR so clinicians can reach it from their normal patient or encounter workflow. The exact mechanism varies by EHR vendor, version, and your organization's preferred configuration patterns — your EHR clinical applications team is best placed to choose the placement that fits your workflows.
Access to the launch entry point is typically gated by your EHR's role-based security configuration. Coordinate with your security team to grant access to the appropriate user classes or departments once the launch entry is in place.
Verify the app is working
Validate the integration end-to-end by launching the app from a patient or encounter chart in a test EHR session. A successful launch looks like this:
- The app opens in an iframe-style window inside the EHR interface.
- No launch errors or error screens appear in the app.
- No OAuth2 or authentication errors are returned by your EHR's authorization server.
- The user lands on the Request List page for the patient, titled Requests for <patient name>.
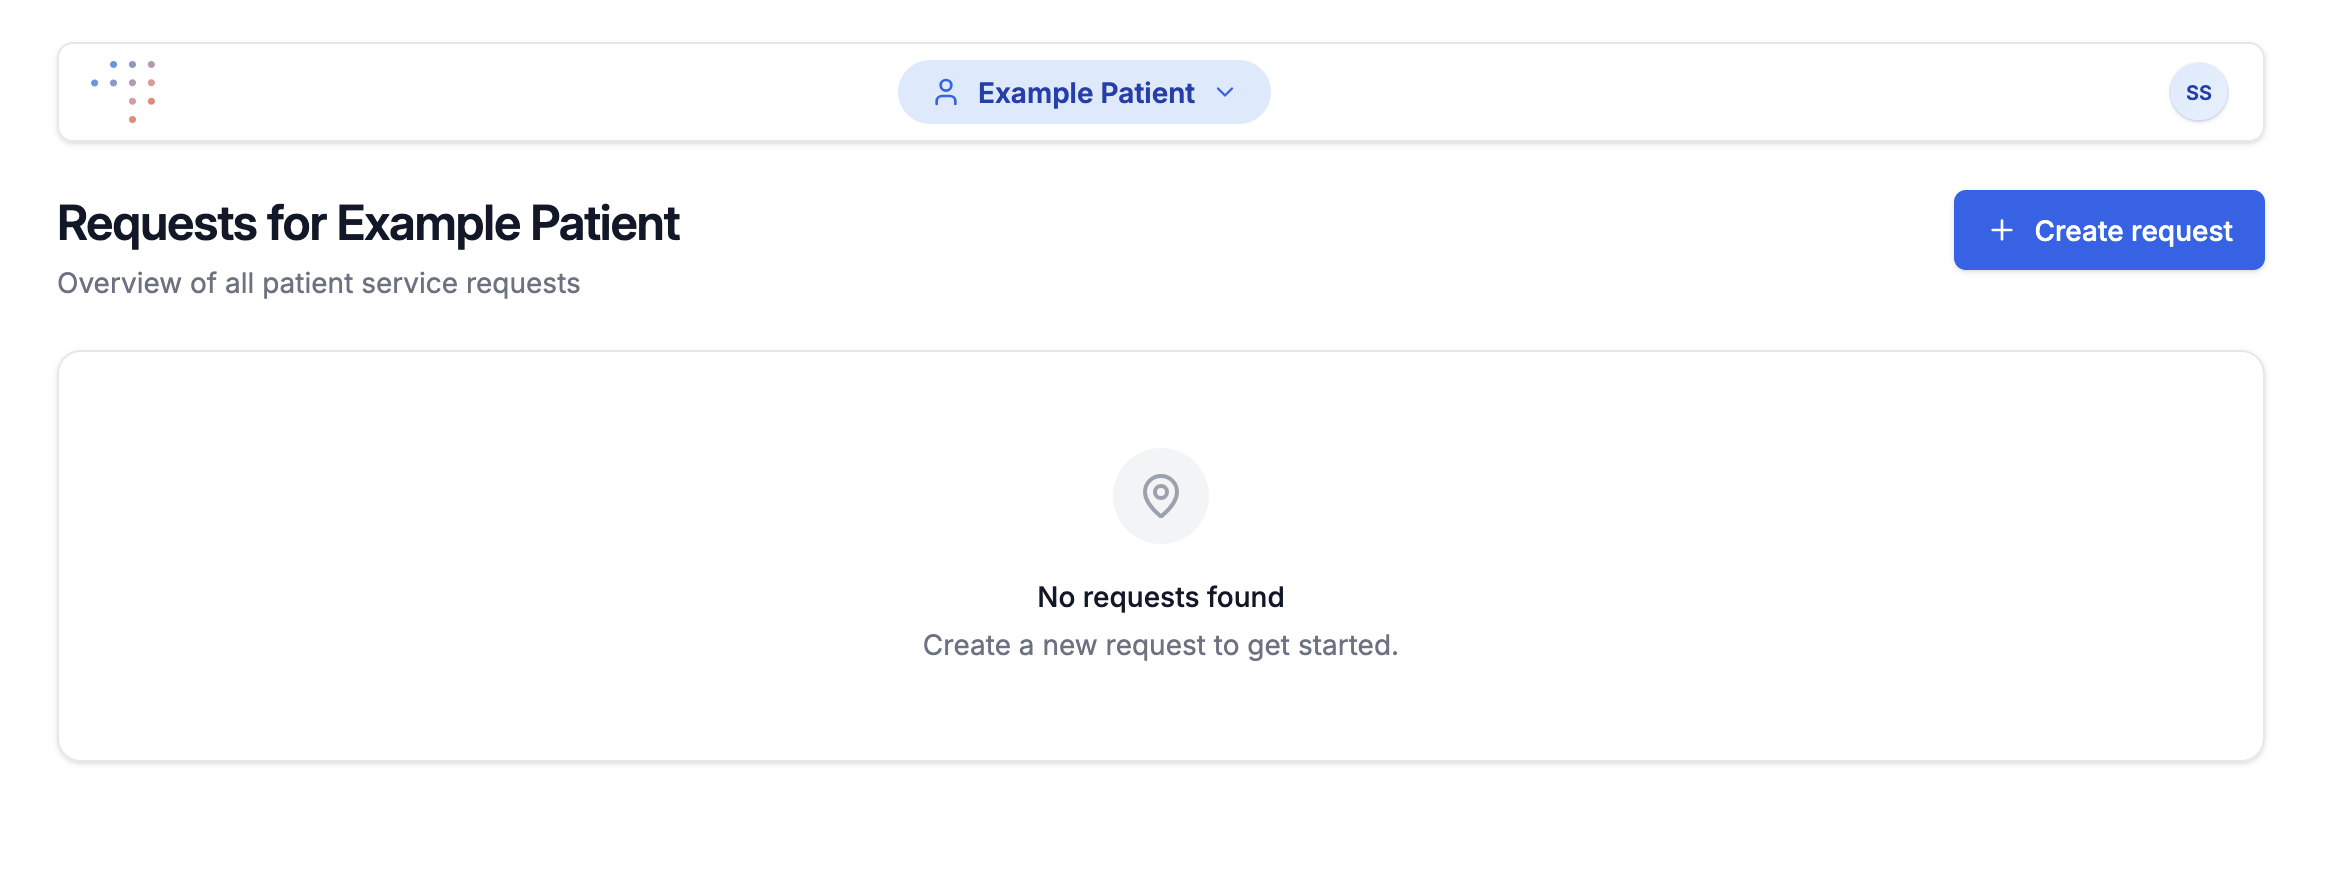
Reaching the Request List confirms that the SMART launch flow, OAuth2 authentication, and session handoff between the EHR session and the VectorCare session are all working correctly. Other in-app flows rely on the same foundation, so this is a strong signal that the integration is wired up.
NOTE
Enabling the Create Request flow requires additional VectorCare-side configuration, handled separately. You don't need it to verify the SMART on FHIR integration itself.
Need help?
If you have questions or need assistance at any step, contact us or reach out to your VectorCare representative.